Stale warning
This protocol has not been updated this year! Last update was on December 11, 2025.
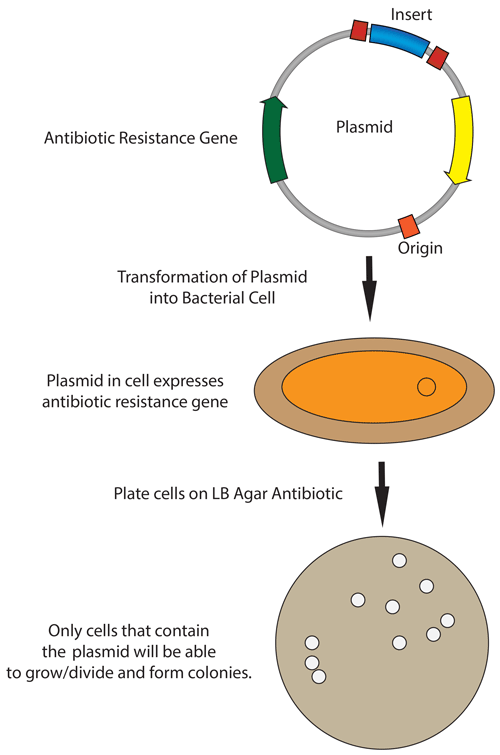
Bacterial Transformation
Cloning Summary
In molecular cloning, we transform DNA of interest into competent bacterial cells. There are several different competence methods that require different transformation methods. After transformation, bacteria that have incorporated the DNA of interest are selected for using various antibiotics.
Transformation (Chemically Competent Bacteria)
Estimated time
1 to 2 hours
Take chemically competent cells out of -80°C and thaw on ice (approximately 10 mins).
Remove agar plates (containing the appropriate antibiotic) from storage at 4°C and let warm up to room temperature and then (optional) incubate in 37°C incubator.
Mix 1-5 µL of DNA (usually 10 pg – 100 ng) into 20-50 µL of competent cells in a microcentrifuge tube. GENTLY mix by flicking the bottom of the tube with your finger a few times.
Note
Ensure that your total volume of transformed DNA/reaction mixture does not exceed more than 10% of the total volume (ie., for 50 µL of competent cells, don’t exceed more than 5 µL of DNA or reaction mixture). Transformation efficiencies will be approximately 10-fold lower for assemblies like ligations than for an intact control plasmid.
Incubate the cell/DNA mixture on ice for 10 min.
(Optional) Heat shock each transformation tube by placing the bottom 1/2 to 2/3 of the tube into a 42°C water bath for 30-60 sec (45 sec is usually ideal, but this varies depending on the competent cells you are using). Put the tubes back on ice for 2 min.
Note
With the competent cells used in our lab, a heat shock step is not required but may increase transformation efficiency. (Deon has observed better cloning outcomes when he heatshocks and recovers, especially when working with ccdB/Chlor selection). For lower efficiency cloning strategies, such as ligation reactions, this can increase the resulting number of bacterial colonies.
Add 250-1,000 µL LB or SOC media (without antibiotic) to the bacteria and grow in 37°C shaking incubator for 1 hour.
Note
This outgrowth step allows the bacteria time to generate the antibiotic resistance proteins encoded on the plasmid backbone so that they will be able to grow once plated on the antibiotic-containing agar plate. This step is not critical for Ampicillin resistance but is much more important for other antibiotic resistances. If skipping the outgrowth step, 300 µL of Elga water can be added to help spread the cell mixture.
Add some or all of the transformation mixture along with sterile glass beads onto a 10 cm LB agar plate containing the appropriate antibiotic. Spread the mixture by gentle shaking in a lateral motion (shaking in a circular motion will cause bacterial colony growth only around plate edges). Discard used glass beads into the designated, bleach-containing box.
Note
If the culture volume is too big, gently collect the cells by centrifugation and resuspend in a smaller volume of LB so that there isn’t too much liquid media on the agar plates. If the agar plate doesn’t dry adequately before the cells begin dividing, the bacteria diffuse through the liquid and won’t grow in colonies.
Incubate plates at 37°C overnight.
Note
Use 30°C if you are working with unstable vectors (e.g. repeats and/or viral vectors).
Tip
For most cloning strategies, 2-5 µL of the reaction mixture is sufficient to add. Ligation reactions are less efficient and may require larger volumes. Usually, using 30 µL of competent cells and 300 µL of SOC media (or Elga water if plating with Ampicillin) yields a sufficient number of bacterial colonies.