Test PCRs
Test PCRs are an important technique that we use to estimate how many amplification cycles to perform and to ensure that we do not over-amplify libraries prior to sequencing. Over-amplification reduces library complexity and biases towards shorter fragments.
Three key variables that depend on which genomics technique source procedure are:
The desired amount of product. A common sequencing minimum is 15 µL of a 2 nM library. For a ~500bp library, this is 5 ng. Normally, you want to amplify to reach 50-500 ng per library. This variable sets the number of test cycles that need to be performed.
Choice of primers based on how the library was constructed. Libraries created via adaptor ligation use one set; libraries created via Tn5 transposition use another set. Fancier methods might have custom primers.
Real PCR volume to input volume ratio. The suggested protocol uses 3 µL of input for the test PCR. Normal upstream elution volumes vary from 25 to 50 µL. The ratio between the volume used in the test PCR and the volume used in the real PCR is important; it defines how many delta cycles are between the test and “real” PCR.
Remove Ampure beads from the fridge and the dual-indexed primers from the freezer and allow both to equilibrate to room temperature.
Prepare enough PCR mix. You will need 27 µL of mix per reaction; prepare 10% excess. You can use either undiluted 100 µM primers or diluted 10 µM primers.
PCR Master Mix (27 µL / condition)
Component
Volume (100 µM primers)
Volume (10 µM primers)
2x NEBNext Ultra II Q5 Master Mix
15 µL
15 µL
DEPC-treated water
11.85 µL
10.5 µL
forward primer
0.075 µL
0.75 µL
reverse primer
0.075 µL
0.75 µL
Note
We use 1/4 of the amount of primers that the NEBNext protocol suggests. Empirically, this works great! Pick the dilution that makes sense for the number of samples you are running. For example, don’t use the undiluted primers if you only have 3-4 conditions.
In fresh PCR tubes, add 3 µL of the bead slurry per condition to 27 µL of PCR Master Mix. Decide on the number of cycles you wish to test, generally (N, N + 2, N + 4). To test different cycle lengths, there are 42°C holds where you take 7 µL subsamples during the course of the program.
Temp (°C)
Time (MM:SS)
Description
72
5:00
Polymerase activation
98
0:30
Initial denaturation
–
–
N cycles
98
0:10
Denaturation
65
1:15
Extension
–
–
cycle end
42
Hold
Remove 7 µL Qubit sample and 7 µL gel sample
–
–
2x cycle
98
0:10
Denaturation
65
1:15
Extension
–
–
cycle end
42
Hold
Remove 7 µL gel sample
–
–
2x cycle
98
0:10
Denaturation
65
1:15
Extension
–
–
cycle end
42
Hold
Remove 7 µL gel sample
The test PCR process takes four samples: three to run on a gel and one to process with Qubit. While the initial cycles of the PCR are running, prepare four sets of fresh PCR tubes and a normal DNA gel. For three of the sets of tubes, place 3 µL of Orange Loading Dye in each.
When the hold step is reached, do not hit enter to continue. Instead, pause the run, press the lid open button, and briefly take the tubes out. Use the multi-channel P10 to take a 7 µL sample, combining with the pre-prepared 3 µL of Orange Loading Dye if taking a gel sample. Place the tubes back in the thermocycler, close the lid, press lid close, press resume, then hit enter to continue past the hold.
Note
It is fine if your input samples contain streptavidin or other magnetic beads. They do not interfere with downstream processes.
Run the three samples per condition on a DNA gel. It is convenient to group the three runs per condition together.
While waiting on the gel to run, cleanup the samples for Qubit using Ampure beads. You can also use SPRI beads, but we use Ampure beads to cleanup the final PCR.
Vortex the Ampure beads well.
Add 0.9x (6.3 µL) of Ampure beads to each 7 µL Qubit sample, mix well via pipetting.
Incubate at room temperature for 15 minutes.
Place tubes on the magnetic rack. Remove the supernatant, and wash twice with 200 µL of freshly-prepared 80% EtOH without disturbing the beads (e.g. keep the tubes on the magnet).
After the last wash step, remove residual EtOH using a P10.
Air-dry the beads until the shiny-to-matte transition happens, not longer than 5 minutes.
Add 20 µL of 0.1x TE to elute. Mix well via pipetting and incubate off-magnet for 2 minutes at room temperature.
Place the tubes back on the magnet and transfer the supernatant to new PCR tubes.
Image the DNA gel, both on our imager and an actually-linear imager like the Niles lab imager.
Process the Qubit samples. If you are unsure about the concentration, prepare both a 1 µL samples and a 10 µL sample.
Dilute the Qubit light-sensitive reagent 1:200 in Qubit dilution buffer to make working buffer. For 8 samples + 2 standards, this is 10 µL reagent + 1.990 dilution buffer.
In Qubit tubes, dilute 10 µL of Standard 1 and Standard 2 with 190 µL of working buffer.
In Qubit tubes, dilute 1 / 10 µL of each sample with 199 / 190 µL of working buffer.
Vortex all tubes to mix well.
Measure at the BMC. Multiply the given concentration by the dilution factor (20x or 200x).
Estimate the number of required cycle counts for the real PCR per condition. Use both the gel and Qubit measurements to estimate how much amplification is needed to hit the target amplification. The Qubit measurement can saturate: prefer the gel quantification results over the Qubit method if in conflict.
For the gel-based quantification, you want to estimate the cycle count that results in a visible fragment smear, but that is also not over-amplified. Depending on genomics method, you may see mononucleosome/dinucleosome/trinucleosome smeared peaks on the gel; this is expected.
For example, for a 500 ng amplification shown here, a cycle count corresponding between the first and second lanes would be appropriate:
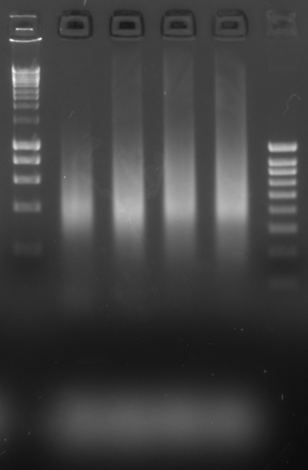
Let’s assume that the optimal test PCR cycles is 13, based on the gel and that our real PCR will use 19 µL of input. Note that we ran 7 µL aliquots of a 30 µL reaction, where each was loaded with 3 µL of bead input. In effect, each test PCR gel lane corresponds to 7/30 * 3 = 0.7 µL of bead input.
Thus, the real PCR will require \(\log_2(19/0.7)= 4.76\) fewer cycles than the optimal test PCR cycle count. While we don’t want to excessively over-amplify, diluting the final library is better than re-PCRing! In this example, the target real PCR cycle count would then be \(13 - 4 = 9\) cycles.
To perform the Qubit calculation, take the Qubit concentration \(x\) (post-adjusting for the dilution factor, in ng / mL) and calculate the total effective mass for a \(N\) µL PCR sample. Note that we eluted in 20 µL of 0.1x TE, and the sample was generated from 0.7 µL of input, so this is:
\[x \frac{\text{ng}}{\text{mL}} \cdot 20 \mu L \cdot \frac{1 \text{mL}}{1000 \mu L} \cdot \frac{N\;\text{real PCR volume}}{0.7\;\text{test PCR volume}} = 0.0286 \cdot x \cdot N \;\text{ng}\]Say we want to have 500 ng total for the real PCR reaction with 19 µL of input. If the Qubit concentration was 1500 ng/mL, then this calculation gives:
\[0.0286 \cdot 1500 \cdot 19 = 815\;\text{ng}\]so we should reduce the PCR cycle count by \(\log_2(815/500) = 0.70\) cycles.